Asheville

I haven’t written much since I’ve arrived in Asheville. Getting accustomed to a new place pulls attention in many directions. I wanted to give an update, though, since my last post was in December, and I’ve been up to a lot.

Since it’s spring (though really chilly today) I have been working on planting a garden.

Snap peas and kale are doing great so far. It feels so great to be growing things.

I’ve been making new friends, an important part of embracing my new community. Some of my friends have goats:

Goats with babies.

I have been working on making a dairy-free almond-based yogurt. Making yogurt is on my Life List, and I’m so happy to have come up with something I like! I had originally intended to make traditional dairy yogurt, but I have found that without dairy, my sinus headaches have all but vanished. I tried almond and coconut yogurt from the store, but they just didn’t have the tang that I feel a good yogurt should. Also, the texture was… icky. So, I decided to make my own. I use a crock pot, and I’ve done a few batches now. Next time I make it, I’ll take photographs and write about my method.

I’ve also been working on a gluten-free bread. I tried many variations and had many failures. Failures of the sort where the bread is not even good for bread crumbs. Not even the birds would touch it. Ouch. My stomach can’t handle a lot of xanthan gum, and I searched for a long time for a recipe that would work for me. I discovered a recipe on another blog, which uses psyllium husk and ground chia seed for the binders. And you can knead it! I’ve even made it into bagels:

I’ve made some adjustments to the recipe so that the flours used are more to my liking, and measured by weight instead of volume. It made a GREAT thin-crispy-chewy pizza crust too. I’ll write about my recipe soon. Also on my Life List is to make 100 sourdough recipes. I started the life list while still using wheat flour, and this bread recipe gives me hope that I’ll be able to make great gluten-free sourdough breads and other goodies. I’m excited to start with sourdough, but I feel that I have some little things to work out with the yeast recipe before I add another challenge.

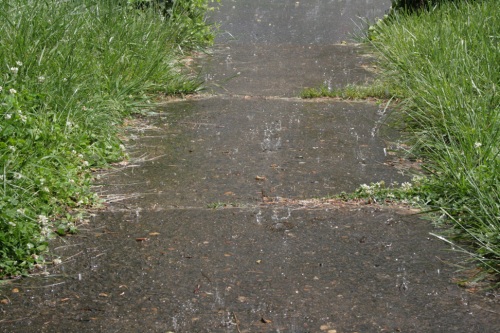
I’ve been enjoying the spring weather here, including the rain:

And last, but certainly not least, I’ve got printed greeting cards of my paintings!

They are for sale in my Etsy shop, and they’re available in a few local shops (Asheville Art Supply, Hickory Nut Gap Farm Store, and Thyme in the Garden)! I’m also taking part in an up-coming exhibition at Asheville Art Supply, starting in early May. I bought a lot of frames yesterday for my paintings, and will be matting and framing this week! More details to come soon.

I have been perfecting making homemade refried beans in bulk (they are great for freezing!), and I have a pot on the stove right now. Once you make homemade, you won’t bother with the cans anymore! I use a method that one of my sisters told me about. Boil/simmer beans (I like a combination of black beans and pinto beans) as you would to cook dried beans, but when you get to the simmering stage, add bay leaf, garlic cloves, salt, and chili pepper flakes, and any other spices you like. Let it all stew together and add more hot water if it gets too low. When the beans are very soft, mash them in the pot (don’t drain the water out). Super easy, and delicious. Don’t leave out the bay leaf – it adds a lot of wonderful flavor. I don’t use measurements for any of it, I just go by eye and add more salt or spices if I need to near the end. These will go great with the cilantro that’s in the fridge (can’t wait for the cilantro in the garden to be ready)!

I’m off to stir the beans again. If I’m lucky they’ll be ready for lunch time.

A Comfortable Chair

I had plans for that morning. I do not remember them now. They weren’t pressing. I walked by the chair in the living room and loved the way the light shone on the smooth fabric of the wrinkled surface. It was just right to draw. I quickly grabbed my sketchbook and settled onto a much less comfortable chair to draw this one:

green chair pencil drawing armchair

It feels stable, comfortable. Inviting. I didn’t notice until drawing the chair that its cushion is shaped like a slice of bread. I like that. The chair is green, a bit darker than the stool on which the sketchbook is placed in the photo above, and I love the color. But drawing it in shades of grey allowed me to appreciate the shape of the chair more. I especially loved drawing the arms of the chair, complete with curved tops and tacked fronts.

If you look at an object and set aside the color, what aspects do you begin to notice and appreciate?

Drawing by Inspiration

I’ve been doing a lot of drawing lately through inspiration. This small drawing is a loose interpretation of a photograph I admired a few days before drawing it. Putting pencil to paper and seeing what emerges is so exciting. That being said, off I go to draw again.

glade forest trees drawing inspiration

Summit

This is one of a series of five paintings in which I first embroidered or otherwise embellished the canvas with texture before adding any paint, and it’s one of two in which I used an embroidery hoop to stretch and frame the canvas. It is one of the paintings that hung in the Exeter, NH exhibition mentioned here.

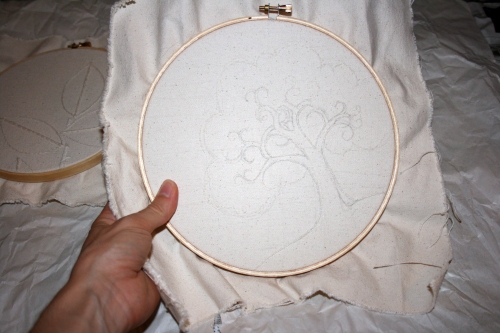
After cutting and stretching the canvas, I started with a pencil sketch on the raw canvas. Then I embroidered the canvas.

summit progress painting embroidery tree

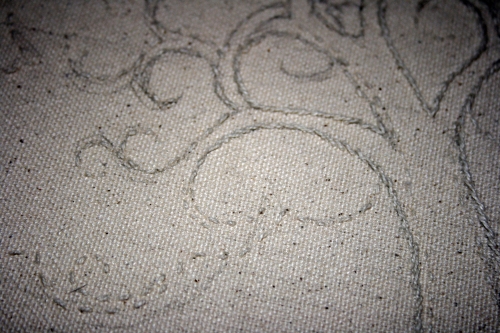
I used strings that were pulled from the edges of the canvas as the embroidery thread:

summit progress tree embroidery close-up

I then trimmed the edges and secured them behind the frame, and started painting.

And when I finished painting, it looked like this:

summit tree painting embroidery sunset

I have just moved, and I’ve left most of my art supplies behind, so I have to buy new ones before beginning painting. I can’t wait to get my hands on some canvas and paint again! I’ll be writing about the other paintings I had in the latest exhibition, so stay tuned for the rest of the bunch.

Pumpkin Carving

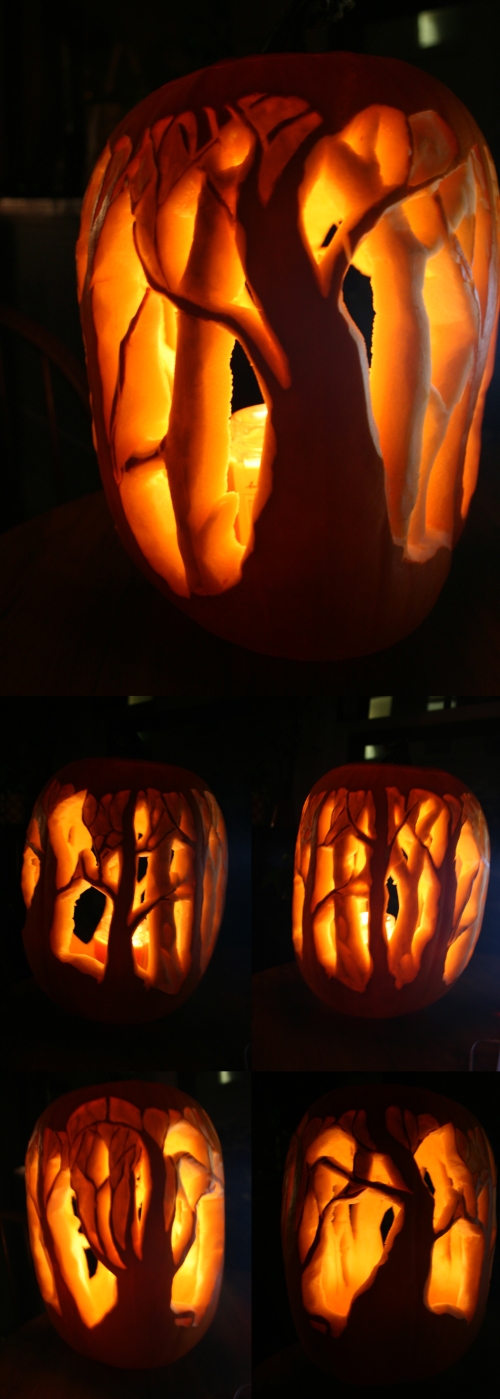
Yesterday I carved a pumpkin. It had been in my apartment for weeks, and I kept meaning to do something with it, but I didn’t know what. I guess in this case, it’s lucky my apartment is a bit cold, so it stayed fresh over time. Finally inspiration struck, and I started carving.

carving pumpkin halloween art trees

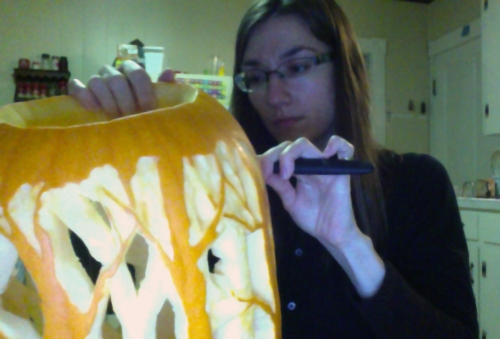
Forest pumpkin carving in progress

It took me most of a day to finish it. After removing all the guts and roasting the seeds, I began the carving process by sketching a forest onto the pumpkin with a permanent marker. I carved around the whole pumpkin, which I’d never done before, and I knew I would be compromising stability, but I wanted to give it a try anyway.

First I cut out the largest holes with a sharp paring knife, making sure that I left enough flesh in between each hole for the pumpkin to retain its structure. To get more detailed areas with thin branches, I carved away the skin, but left the inner flesh intact. To do this, I used the tip of the knife to trace the edge of the area that I wanted to cut away. Then I used a straight vegetable peeler (this style) to gently “pry” the skin away from the lighter flesh underneath.

After many hours of carving, I was relieved that I was finally done with my pumpkin masterpiece, since my hand was rather sore. If I do another one of these, I’ll sharpen the knife as I work – by the end, the cutting was becoming difficult. When the blade is sharp, cutting is easier, and I don’t grip the knife so tightly – same goes for everyday cooking, but generally I’m not chopping for hours to make myself a meal.

I was pretty pleased with my results, and even more happy once I saw the results from turning off the lights and putting a candle inside:

carved pumpkin halloween art forest trees

Those are five views of my pumpkin. It looks so different from each side, and has no “back” – an element that I struggled with in my 3-D ventures during my art studies. A pumpkin, round(-ish) already, is the perfect medium for such a sculpture.

What will you carve into a pumpkin this year?

Happy Halloween, everyone!

Emerging Artists, Exeter, NH

In this series of work, I combined embroidery, crochet, found objects, and acrylic paint on canvas. My work focuses on Nature’s variety of beautiful textures and colors. Through my paintings I aim to evoke its simultaneous simplicity and complexity.

exhibit 30 under 30 exeter nh nature paintings

I have close-up images of each painting, and I’ll be writing entries on each painting individually. For now, go and SEE the paintings in Exeter, NH!

Life List Explained

Some of you may have already seen the new page I’ve added to this blog – Life List. The creation of my list was first inspired by this list, and I first wrote about it over a year ago. At the time, I wanted to make the list 100 items long before I posted it here. Many months later, it hasn’t quite reached 60, but I am more than ready to share it – to discuss it, to hear ideas of your own, to tell you about my progress as I tick things off and add new ideas. As I’ve stated, I like the “concept” of 100, and perhaps I’ll reach it. More importantly, I think once I achieve certain goals I’ve listed, I’ll be inspired to add new ones.

For example, #2 on my list is to run a 10k (they are in no particular order, by the way – only the order in which I happened to write them down). I may someday want to run a marathon, too, but that’s not on my list because I would like to see how the 10k feels first (and right now, if someone asked me if I’d like to participate in a marathon, I’d give them a good, solid, “no thank you”).

There’s another list I need to include here. It’s like a Life List, but instead it consists of things I’ve already done before starting the list, or without listing them. Acknowledging that life is rich and that I’ve had some great opportunities is just as important to me as looking into what I may do in the future. Conversations with my friend Dani have led me to start said list, and I’ll include it here when it’s ready (thanks, Dani!).

Here are some items from the Life List (you can read it in full here), along with some explanations:

8-Have my own art studio: This has been a dream of mine since I was about 10 years old. I am finally getting to the point in life where I feel like it can be a goal instead of a dream or a wish. Since I graduated from my painting degree, I haven’t worked in a studio. An art “studio” to me is a room dedicated to art. I’ve been working in corners of living rooms and bedrooms for years, and while I am thankful to have any space and materials to create art, I think having a dedicated, larger space for my art will be extremely beneficial to me as an artist, and as a person who prefers not to tip-toe over her art when she opens her dresser drawers.

19-Write and illustrate a cookbook of my favorite recipes: This goal combines two things that excite me – cooking and drawing. I love trying new recipes, and tweaking them to make them my own. And anyone who knows me knows that I love to draw. I haven’t started this project yet, except for developing some recipes and floating vague ideas around in my head about layout and style. Anyone have any ideas that would give the kick in the butt I need to start this? I have really no idea where to start the process of Writing a Book.

36-Visit a rainforest: My second-grade class decorated our whole classroom to look like a rainforest. We studied the rainforest and its animals and plants. I loved it – couldn’t get enough. Since then, I’ve wanted to visit a rainforest. That was 20 years ago. I’m still fascinated (thank you, Mrs. Golisch!).

I’ll be writing details about more of the items in later posts. I’ll also write about my progress with them. What are some items on your list?

What Time Does

Time slips away.

Months pass.

Gorgeous moons rise and fall beyond the horizons. Deep golden ones with red auras.

Living spaces change.

Habits develop.

New people walk into your life, unexpected.

I’m still drawing, still painting, and I feel more inspired than ever. I’m just recording it less these days.

More inspired than ever. It feels wonderful.

I’ll share again.

Orchids II

For my second batch of orchid photographs (see the first here), I have chosen two pinks – hot pink, and a more purple, muted pink. I love the way this first one looks like a blossom explosion. It’s as if, a second ago, these all could have been tiny buds, then you blink, and POW! they’ve blossomed. They look like they have only just stopped moving. They also look they like are whistling.

hot pink orchid flower photograph

At the orchid show I experimented with taking photographs at more unusual angles, as in this next one:

orchid pink purple photograph

I like how this angle highlights the little spiraling tendrils on each flower.  The leaves in the background provide a contrast to highlight the delicate, precise shape of each flower. In addition to these photographs of orchids, I’ve been taking shots of new spring flowers, which I’ll be sharing on my Facebook page.

Salted Crimson

The following is a painting that I created especially for one of my brothers. I was trying to think of a painting that he would really want to put on his wall, whether his sister had painted it for him or not. And now that he’s received it, I can post my artwork without ruining the surprise:

enterprise star trek outer space spaceship

This is, admittedly, a bit of a poor photograph. I quickly snapped it before I wrapped it up to send, and did not check the photo before wrapping it. The top third of the photo should appear much less grey.

Paintings and drawings like these have always been a big challenge for me. Architectural shapes, as opposed organic shapes, cause so much more brow furrowing, frowning, and erasing. However, it was a great exercise and a reminder that I should practice drawing highly geometric forms more often. The background, however, greatly contrasts the tightly drawn ship. I used several layers of paint mixed with lots of water to create the nebulous shapes. In the first layer or two I sprinkled salt, which highlights watercolor’s unpredictability wonderfully. The texture in and around the light crimson nebula on the right side was largely created by adding salt just after painting. I brushed away the loose salt after drying and let the remaining salt adorn the paper.

I loved adding all the details to the ship. After I was done painting, I outlined choice areas in black ink, then moved on to colored pencil. By adding colored pencil over the top of watercolor, I can achieve detail, contrast, and effects that I cannot with watercolor alone.

Flowing amoebic forms, sharp geometric details, deep texture, and bright colors made this work of art fun and interesting to create, even though it was not one of my normal subjects. What have you created recently that was out of the ordinary?